Monday 31 August 2009

Mutta Marichathu (Egg and Plantain turnover)

Hi all,
This is another snack best for making during Ramadan. I have already posted this recipe long back but with another name (Plantain sweet). Now I am re posting this by editing the old post with better pics and the original name and a slight different method. Sorry, I didn't know the original name before!


Mutta Marichathu was one among many dishes that I had back home. It is mainly made of plantains/nenthrappazham and eggs. My younger sister made for us (myself and hubby) when we went to my aunt's house and we absolutely loved it. Yeah, it was too good. Its is kind of a cake or pudding like stuff,very easy to make, takes very less time and tastes delicious and very moist. It's one of the best snack you could make for someone coming home with quick notice. It is also good for making during Ramadan. There are many other recipes that can be made with plantains and I guess such dishes are mostly made in Muslim houses in kannur and Thalassery.


Ingredients:
Ripe plantains - 2 no.s (540 g)
Extra large eggs - 5 large
Sugar - 12 tbs (or as per individual taste preference)
Cardamom powder - 3/4 tsp ; Cardamom - 4-5 crushed
Ghee - 1 tbsp (Can use more if preferred)
cashew nuts - 8 no.s crushed (optional)
raisins - 1 tbs (optional)

Preparation :
1.Cut the plantain into two halves(lengthwise) and again cut the halves into further halves (lengthwise). Slice the plantains into medium thin slices. Not too thin and not too thick.
2. Heat a saucepan,add ghee and plantains and saute on medium heat until the plantains get cooked and turn just golden in colour here and there.
3. Meanwhile in another dish, break eggs, add sugar and cardamom powder to it and beat lightly for a couple of minutes. (1 -2 minutes).
4. Add the cooked plantains in the egg and sugar mixture and stir well until uniformally distributed. Pour it back to the pan that was used to fry the plantains, COVER it and cook it over very low flame until the top part is set.Once the mutta marichathu is cooked, the egg on top will be hardened, It should take 10-20 minutes depending on the saucepan used.
5. Transfer this to a another plate and cut into small squares and serve hot or warm with tea.
6. Can be stored in fridge and stays up to 3-4 days. Warm it up and serve if refrigerated.

N.B: If using nuts, just before frying plantains, add a tbs of ghee, saute the crushed cashews until golden and keep aside. In the same pan put raisins and saute until they all puff up. Remove at once and keep it along with nuts. Mix it with egg and plantains and pour to the saucepan and cook it until done.

2. You can use 4 Ex large eggs and 10 tbs of sugar, if you want to use less number of eggs; that is perfectly fine.

This is another entry of mine for Joy From Fasting To Feasting conducted by Lubna and Yasmeen .


Friday 28 August 2009

Spring Roll and a TAG!


Spring roll is a snack made with the Meat masala filled in pancakes. The pan cakes are filled with meat or vegetable masalas and then dipped in egg and then coated in breadcrumbs to give a very crispy and crunchy wrap and delicately spiced filling. This is one of the usual snacks made during Ramadan and is easy if you have the filling made ahead. This is not the regular Chinese spring roll with crispy pancakes, but a very modified and a different version that is made at home mainly during Iftar and to serve guests. Some call it ‘Churulappam’ since it is made by rolling the pancakes. With the below mentioned recipe, you will be able to make 14-16 rolls. I fried half and the rest I froze them for later use. So next time when I need to fry them, all I have to do is just defrost them and fry them.

Ingredients:
1 cup Plain Flour (150gms)
1 1/4 cup water
1 medium size egg
Salt to taste

For the filling:
1 heaped cup of Meat masala

For coating:
1-2 Eggwhites
Breadcrumbs- As required
Vegetable oil- To deep fry the spring rolls.

Preparation:

1. To make the batter, Mix all the ingredients well in a large bowl using a balloon whisk or Blend them in a blender until everything is blended without lumps.
2. Heat a small frying pan onto medium heat; pour ½ a ladle of batter to form circles of 5” diameter.
3. Just cook the pancake on one side ONLY and take them out.(The pancake will be cooked on both sides this way).Place them in a plate rubbed with oil. Place a heaped teaspoon of the masala on the uncooked side as shown in the picture. Place it in the top part from middle, an inch away from the sides. Fold both sides to enclose the filling in and then roll it completely to seal the filling in.
4. When you fill one spring roll, you can start making the next one.
5. Dip the roll in lightly beaten egg whites and then roll it in breadcrumbs until fully coated. I normally use the spoon or fork for this as it is quite messy when done with hand.
6. Heat a frying pan filled halfway with oil. Fry these rolls in the oil until golden and crisp.
7. Serve whilst warm with ketchup, chilli sauce, sweet chilli sauce, chilli garlic sauce etc.

And Now Sushma Mallya has tagged me and here are few other bits about me.
The Rules:1. Link the person who tagged you.
2. Post the rules on your blog.3. Share the ABCs of you.
4. Tag 4 people at the end of your post by linking to their blogs.
5. Let the 4 tagged people know that they have been tagged by leaving a comment on their website.
6. Do not tag the same person repeatedly but try to tag different people, so that there is a big network of bloggers doing this tag.The Tag:

1. A – Available/Single? No
2. B – Best friend? My mom and sis mainly;and few more school/college friends of mine who I am very very close to.

3. C – Cake or Pie? Definitely Cake
4. D – Drink of choice? Milk Shakes and smoothies.
5. E – Essential item you use every day? Laptop, my measuring cups and spoons and my kitchen scale. I just love them.
6. F – Favorite color? Nothing as such.
7. G – Gummy Bears Or Worms? Gummy bears
8. H – Hometown? Kerala.
9. I – Indulgence? Desserts and sweets...
10. J – January or February? I don’t think there is anything special about those months, so it’s the same.
11. K – Kids & their names? 1 Son- Rishan
12. L – Life is incomplete without? Family and friends.
13. M – Marriage date? April 28......
14. N – Number of siblings? 2 sis and twin brothers. They are all adorable.
15. O – Oranges or Apples? Not a fruit person.
16. P – Phobias/Fears? Darkness (I always feel there is somebody following me when I am in the dark and keep looking back while I walk in dark even if it is at home...lols...), and reptiles especially lizards found in the gulf (Goodness me!They are huge and disgusting and I can’t stand the sight of it), large spiders, snakes, then comes dogs...oh there are too many...etc....I think I am scared of anything and everything but not scared of cockroaches..
17. Q – Quote for today? Can’t think of one.
18. R – Reason to smile? Many
19. S – Season? Spring/Autumn.
20. T – Tag 4 People? See below.
21. U – Unknown fact about me? That’s Unknown!
22. V – Vegetable you don't like? Hmmm.....none actually.
23. W – Worst habit? Misplacing things around home and searching it for hours and hours and hours. God! The worst part is when I misplace my hubby’s stuffs like his hair comb. And he has to join me in searching just before going for work which almost every time drive him nuts J..There are so many incidents associated with my misplacing. One is when I misplaced the whole bunch of our house keys including the postal box key. My husband was expecting an important mail and he wanted to open mail..Looked out for keys, it was not in the regular place..Myself and my hubby kept on searching and searching and couldn’t find it anywhere. Finally we headed to the garbage and checked that also, Goodness me. It took us more than an hour searching the whole house, and then we gave up. I Told my hubby that we will find it later on somewhere forget about it atleast for the time beaing...Then when I went to kitchen and started off my work, I found it under the tea towel!!!Imagine.
24. X – X-rays you've had? Did I have any?
25. Y – Your favorite food? Sweets, desserts and Certain malabari food. Sometimes it entirely depends on my mood, no...most of the time.
26. Z – Zodiac sign? Scorpio.
I would like to pass the above tag to:
Parita
Faiza Ali
umelbanat
Duchess of Tea
This is my entry to Joy From Fasting To Feasting conducted by Lubna and Yasmeen .

Tuesday 25 August 2009

Chatti Pathal / Chatti Pathiri


Chatti pathal / Chatti Pathiri is a dish that has layers of chappathi/ pancakes and sweet filling. I had bookmarked this recipe last Ramadan when my friend Hanan told me about this dish from www.pachakam.com. She told it was a must try dish and was too good. So I thought I would give it a try. These kind of snacks are only made during Ramadan for Breaking the fast. I wanted to try this since very long time, so tried and we liked it very much and so sharing with you all.

Just while making the chappathi for the ChattiPathal, I remembered that we used to make Atti Pathal, which is similar to this but with savoury meat filling. Some used to make the Pathiri like the Chappathi dough, rolling it and then cooking on the Tawa/ griddle. And some make it by making batter, by mixing maida (Plain Flour), water, egg and salt . I always liked the batter version because it is so soft and is easier to make and tastes fantastic. Some like it with the chappathi dough, but it won't be as soft as the pancake version. I remembered about the batter only while I was making the chappathi. Else I would have done it with batter.Doh!

And again, after shifting to the new place, I dint bake anything until now!! Chattipathal was the first thing I tried baking and I was not very happy in the first place about baking this dish since I had a feeling it was going to be too dry, once it comes from the oven. Anyway, tried to follow the instruction in the recipe as such and popped the chattipathal into the oven. I first set it @170 degrees Celsius, Checked after 10 minutes, and dint see any change, so increased the temperature to 175, and kept for another 10 minutes and the chattipathiri looked exactly like how it went to the oven! My patience being drowned, again increased the temperature to 190 degrees Celsius and kept for another few more minutes and it looked still the same!!!That was when I noticed the oven in the present flat is a crap one. The original recipe mentioned to bake it for 15 minutes, and even after 30 minutes, mine was unshaken. Alas, that's it. I took it out of the oven and cooked it on the stove top in a very low flame and it was real good. No wonder it took ages to get my naan cooked, after all it should take only few minutes. So no baking for sometime...:(.

The recipe asks to use an 8" pan. I had a non-stick pan which has become a stick pan now after my THOROUGH cleaning, and an over proof Pyrex glass dish. Both were of the different size and was wondering which one was 8". Right on time my hubby came in to the kitchen to check for something (Probably to see what I am cooking). I asked him " Hey, which pan do u think is 8 inches?"...My husband as usual, " I dono , what is it for, anyway?".....Myself: " That is to make chattipathal and showing him both pans I told him I think This is 9 inches and the other one is 8 inches.."..And he bursting out in laughter told me"wow, adipoli cooking aanallo(Ironically, Your cooking is great), inch vechaanallo cook cheyyunnathu (You measure in inches while cooking....somewhat like that)". Anyways, I went for the smaller pan because when I made the chappathis it wouldn't get bigger than that small pan. I divided them into 9 small balls. But since it was a "Stick Pan", and I dint oil it properly to reduce the fat, It really stuck to the bottom of the pan!! I had to scrape it off with a spatula halfway! So these were the mistakes I did while cooking and scribbled it in here so that you don't repeat the same mistakes that I dind and hope you can come with a better result.

P.S: Just measured the sauce pan That I cooked it and it is only 6 Inches wide;)..After all it doesn't matter whatever the pan size is. Just make the chappathis to the size of your dish.

Sorry for the poor quality picture, I was so hungry and busy too. But I thin you can get an idea of how it should look once Done.


Ingredients:
For the Pathiris:
1 cup (150 g) Plain flour
1/3 cup warm water
1 tbs vegetable oil
salt to taste

For the filling:
5 small Eggs (8 oz)
10 tbs Castor Sugar(Can adjust according to your preferences, I normally use 2 tbs of sugar per egg)
5 tbsp Grated coconut
3 tbs (30 gm) Raisins
3 tbs (30 gm ) Cashew nuts(broken)
4 tbsp Poppy seeds(Couscous)
1 tsp Cardamom powder
2 tsp Ghee

For Coating:
4-5 small eggs
6 tbsp Sugar
A pinch of Cardamom powder

Preparation:
For the Pathiris/ Chappathi:
1. Mix the flour with water, oil and salt and knead into a dough like that of chappathi. Keep them covered for half an hour.
2. Divide the dough into 9 equal portions.Using a roller pin, roll it out into paper-thin chapathies of uniform size(6 Inches inches diameter) on a dusted flour board.
3.Heat a griddle and cook the chappathis lightly on a tawa. Keep them aside.You should be able to get 9 chappathis with this amount.
Note:You can vary the size of the chappathi depending on the size of the pathiri chatti or the vessel in which you are baking it.

For the filling:
1. Beat the eggs lightly with sugar and cardamom.
2. Heat a Large frying pan.Add ghee and saute raisins, cashew nuts, poppy seeds and grated coconut until they start to change the colour slightly.
3. Add the beaten egg and scramble the whole mixture until the egg is well cooked. Keep it aside.

For the coating and the assembling.
1. For coating, beat the remaining eggs, sugar and cardamom and keep aside.
2. Take a non-stick baking tray, spread couple of tsps oil or ghee all around(spray the nonstick oil).
3. Keep one pathiri as the first layer. Using a spoon sprinkle the scrambled egg filling on top of the pathiri.
4. Dip the second chappathi in the egg coating mixture, coat well and place it on top of the filling.
5. Sprinkle the scrambled egg mixture again and repeat this until all the pathiris and the scrambled egg mixture is used up and pathiri being the top layer. Pour the remaining egg mixture on top of pathiri so that it drains on all the gaps on sides and form a thin layer on top. This is important to keep the Chatti Pathiri moist. If you run out of the egg mixture after coating, break 1 or 2 eggs, mix with sufficient sugar and cardamom and pour on top.
6. Bake in oven for about 15 minutes or until the top of pathiri turns golden.
7. Garnish with cashew nuts and raisins.Traditionally the baking is done in a sealed container with the coconut husk embers on top....Or you can cook it in non stick saucepan on stove, by placing it in very low flame and then flipping it over carefully and cook on the other side.

Notes:
1. I cooked it in the stove because I tried it in my oven and found that it doesn't work well!!So I don't know how it comes out in the oven.
2. Instead of making chappathis as mentioned in this recipe, You can also make pancakes with the above amount of flour, adding an extra egg and sufficient water enough to make a smooth pancake batter. This will give a very soft textured chatti pathiri. I loooove this version.

This is my entry to Joy From Fasting To Feasting conducted by Lubna and Yasmeen.

Recipe Courtesy: Zeba Niyas @ http://www.pachakam.com/

Monday 24 August 2009

Meat masala (Meat Stuffing for Snacks )


Ramadan Mubarak to you guys! This time I am dusting up one of my old recipe that was listed quite long back and relisting it with few updates and a better view of the picture. I usually make masala in a different way and wondered why I never got that authentic taste that we have at home. I had always thought adding so many spices brought that flavour. But to my surprise, I came to know it is the simple ingredients that gave elegant flavour to this meat masala, or stuffing. This is a typical Malabari type filling for samosas or Irachi Ada, puffs, Spring roll and many other snacks and you will find similar taste through out Malabar area. You can make many snacks using this masala. One of our faaaavorite snack is the Bread roll that I make using this filling. It's really great. I used chicken mince to masala this time. You can make the same masala with minced meat as well. Here is the updated version of the recipe.

The best part of making these masala is you can prepare them in bulk and divide them into several small freezer bags and pop them into the freezer for later use. Since this filling can also be prepared days ahead, I always have them in my freezer, so that I don’t have to panic thinking of what to prepare when somebody comes home with quick notice. All you need to do is just take a small bag of masala out of freezer and defrost them thoroughly before use. Don’t defrost and freeze many times as it really alters the taste. So it is better to divide the masala into many individual freezer bags and use as per need rather than defrosting the whole stuff all at once. This masala really lasts for weeks if frozen.

Sometimes, thinking of making the masala itself makes me a bit lazy. Making them requires quite lot of time and work. Lot of onion chopping, peeling and grating ginger and garlic, aah! So I never made them in small quantities. But again, using the processor makes the job very easy. Again, the best part is that, a huge number of snacks can be made by making masala in the below said quantity. These kinds of dishes are mainly made during Iftar and when there are parties or guests coming home. Snacks like samosas, cutlets, bread-roll, spring-roll, attippathiri,stuffed buns etc uses the same masala but all of these taste so different that nobody would even know that you prepared all the snacks using the same filling. You can even use it for making sandwiches. Once the masala is done, to finalise it into snack is very easy and requires less time.

Meat masala

Ingredients:

900 gm Minced meat
4 cups (3 1/2 medium sized) Onion, thinly sliced and then chopped
2 ½ " - 3"- Ginger, grated
10 -12 Cloves of garlic, grated
8-10 Crushed Green chilli
½ tsp Turmeric
1 tsp + 1/2 tsp Pepper powder
1/4 + 1/4 tsp garam masala
Salt – as reqd.
3-4 tbs- Oil
1 tsp - Lime juice
½ - 3/4 cup (loosely packed)- chopped coriander leaves
10 mint leaves chopped

Preparation
1. In a sauce pan Add 2 tbs oil and add minced chicken. Add 1 tsp pepper powder,1/4 tsp turmeric powder,¼ tsp garam masala and enough salt. Cook until the meat is tender and all water has dried up completely. (If using Minced lamb or beef. add half a cup of water and cook until the water is completely dries and meat is well cooked)
2. Slice the onion and chop them into even smaller size.* (see note)
3. Grate ginger, garlic and Green chillies.* (see note)
4. In a large non-stick sauce pan or frying pan add oil and set the heat to medium-high.** (see note)
5. Add the onion, grated ginger, garlic, green chillies and salt and sauté until onion becomes just translucent i.e. they have become soft and started turning pale. Don’t brown them. If you see any moisture in the onions at this stage, just turn up the heat, and dry them out. Once the water has completely dried up,add ½ tsp of pepper powder and ¼ tsp of turmeric powder and sauté for few more seconds.
6. Add cooked minced meat and lime juice to this; mix well and simmer for about 5- 10 minutes on medium flame by covering the lid.
7. Add chopped coriander, mint leaves (if adding) and rest of the garam masala to this and stir well and cook for further couple of minutes until the leaves are wilted. Use as a filling for any snacks.


Notes:
* For slicing onions and chopping them you can use the food processor.
You can also add whole garlic cloves, ginger and chillies all together and process in the processor until well crushed.

** You have to be very careful at this stage because using large pans (I use 30 cm or 32 cm saucepans) and medium- high flame is very important thing to keep in mind. Since there are quite lot of onions in the recipe, using a small saucepan and low heat can tend to make the onions soaky and release so much moisture in the masala that it will turn out like curry or sauce .. Keep an eye so that the mixture doesn’t stick to the pan as well.
Another important thing to note is that since you are adding salt to meat, add salt to onions carefully. I always add salt along with onions because they get cooked easily.Apart from using minced meat, u can also make the same masala with chicken pieces cooked in the same way by adding little water and then shredding it once it is completely cooked.

Friday 21 August 2009

Spicy Dahi Murg (Spicy chicken in yoghurt sauce)


This particular curry dish was prepared by mom when we visited her last time in UAE. She served this curry along this curry with paratta and we loved it so so much that we stuffed ourselves like anything. When I asked her what was the name of the curry, she told me, there is no name as such. She just calls it 'Thairu itta chicken curry' (Chicken Curry in youghurt sauce). I asked her where she got the recipe from and she told me she just made it up by herself! I think this was her invention and dint know what to name it after all. So I myself named it Spicy Dahi Murg, hehe. I don't know if that name is apt for the curry after all....When I told my husband that I am going to name the dish dahi Murg, He just laughed and thought that name was funny....And headed for another suggestion to confuse me more.... He asked me " What's that green leaves you added in the curry?"...I told him it was coriander leaves.....He then came up with the name " Spicy coriander chicken" ..... I was not happy with that name so stuck with mine......ummmm.


I had made this recipe with different proportions and every time I made it, it tasted different!! I think it was my temptation to add lots of onions that made so much of difference in the taste. I had almost given up trying this recipe since I wouldn't get the exact taste that I was looking for. The other day, it was ready made paratta for dinner and when thinking of what to make for curry, this 'Dahi murg' started dancing in my mind and the taste of my mom's curry just forced me to give it another try again. And hurray! Got it finally. I dono where I have been doing wrong, probably adding more water to make some gravy to suit my husband's taste, or adding lot of onions to make more thick sauce. This is almost a dry curry I would say or a curry with very thick sauce. Follow the ingredients closely and the outcome will be really good.


Ingredients:
800 g chicken cut into medium size pieces
For marinade:
3 tsp Kashmiri Chilli powder
4 tsp Coriander powder
6tbs (in 15ml tbs) Greek yogurt or any other thick curd
1 tbs lemon juice
1 tsp salt
Others:
1 medium size onion chopped thinly (150g,nearly 1 cup)
1" piece ginger,grated
7 large cloves of garlic,grated
3 tbs oil
1 tsp cumin seeds(jeerakam)
5 whole cardamom
5 cloves
2" piece of cinnamon stick
1/2 cup(loosely packed) chopped coriander leaves
1 medium size tomato (I once used 2 tsp of tomato puree when I ran out of tomatoes and it works fine.)

Preparation:
1. Mix all the ingredients for the marinade and apply it to the chicken.Mix well. Cover and leave it in the fridge for a minimum of 2 hours.
2. Heat a large saucepan and add oil. Add cumin seeds along with other whole spices. When the aroma comes,add in chopped onion,little salt, ginger and garlic and fry until the onion starts to turn golden in colour.
3. Add in the marinated chicken along with 4 tablespoons of water and mix well. Cover and cook in low flame until the chicken is almost cooked and the gravy is very thick.
4. Add in the chopped tomatoes and chopped coriander leaves and stir carefully. Cover and cook until done.
Pairs well with : Neychor, Neypathal (Deep fried rice pancakes with onion, coconut and fennel)
, paratta, puri, chappathi etc.

Thursday 20 August 2009

Tharikkanji (Thari Kaachiyathu) - Semolina paayasam


Ramadan is almost here, and Thari kanji is one of the most regular drinks made at home during Iftar. It is not a regular Kanji that is made of rice and tastes bland and that needs some accompaniments to go with it. It is a refreshing and filling drink made while breaking the fast during Ramadan. This can be made as a savoury drink by omitting the sugar, and by just adding enough salt or a sweet drink by adding sugar and a pinch of salt. I always liked the one with sugar. The traditional taste of tharikkanji comes from the addition of sauteed onions, cashews and Raisins. But if you do not like the taste of sauteed onions, please omit it. It is made in a drinking consistency and is served in glasses. I Made it today, and thought I would put it up here in case somebody needs the recipe beforehand. Thari Kkanji is also known as Thari kaachiyathu in our place.


Before going into the recipe, Here comes Scrumptious blog award from my blogger Friend faiza . Thanks faiza. You are really sweet.

It is the Scrumptious Blog Award -a blog award given to sites who:
Inspire you
Encourage you
May give Fabulous information
A great read
Has Scrumptious recipes
Any other reasons you can think of that make them Scrumptious!


The rules are:
Put the logo on your blog or post.
Nominate at least 7 blogs
Let them know that they have received this Scrumptious award by commenting on their blog. (I face some problem while commenting on many sites, So if you see this award nominated to you please accept it!)
Share the love and link to this post and to the person you received your award from.I would like to pass this award to my following blogger friends:

Pooja
Sarah Naveen
Superchef
Parita
vidhas
Divya Kudua
Varsha Vipins

Now for the recipe:
Ingredients:
1/4 cup (4 tbs) Semolina
4 - 5 tbs sugar
1/4 teaspoon salt
2 cups Thin coconut milk
1 cup thick coconut milk
1 teaspoonful Ghee (can use 2 tsp if preferred)
1 tbs Cashew nuts
1 tbs raisins
1 tbs -2 tbs Sliced Shallot
1/2 tsp cardamom Powder or 3-4 cardamom pods crushed

Preparation:
1. In a saucepan, add semolina, sugar, salt and thin coconut milk and stir well. Keep it on a medium flame stirring continuously and bring to boil. Reduce the flame and keep it simmering for 5 minutes until semolina is cooked well and the mixture is slightly thick. Keep it aside.
2. Heat a small kadai and add ghee. Add the sliced shallots and cashews and fry them until they turn brown. Add raisins and let them puff up. Remove this tempered oil and add it to the above Thari Kanji and stir well.
Notes:
1. If you make Tharikkanji using the above measurement , you will get slightly thick, but in drinking consistency and it is normally had in glasses. If you want it more thick, Add 1 tbs more of semolina.
2. Regular full fat milk can be substituted instead of coconut milk. Or you can use 2 1/2 cups of full fat milk/semi skimmed milk and 3/4 cup thick coconut milk. Anyways it is delicious. It is just how you prefer to have it.
3. Keep stirring the mixture all the time while cooking to avoid lumps and semolina sticking to the pan.

Tuesday 18 August 2009

Mutta Porichathu (Egg Fritters)

Mutta Porichathu is one of the most simplest of fritters. Like pazham porichathu (Plantain fritters) or dates porichathu (Dates fritters), Egg fritters are also made in the similar way . I normally make this during an evening tea or iftar. This is one of my hubby's favorite snacks and he was the one who showed me how to make it. And one of my readers - Zeb had asked me to post ramadan recipies here, so this one is for her. Even though simple, I didn't know this one until my hubby told me about it. I have few recipes in draft, but the problem is putting them up here, since typing and editing and adding pics and all takes lot of time. Will try to put them all as time allows:)

Ingredients:
6 medium size eggs, boiled and shelled
Seasoning for eggs:
Salt - As required.
pepper - As required
For batter:
1/3 cup plain flour (Maida)
2 tbs rice flour
a pinch of salt
water - as required
Oil - to deep fry the fritters
Preparation:


1. Cut the boiled eggs lengthwise. Sprinkle black pepper ans salt on the cut side.
2. Mix the flour with salt. Make a medium thick batter by adding enough water to flour.
3. Slowly lift the seasoned eggs with a spoon and drop it in the batter. Pour the batter with a spoon over the eggs until the eggs are covered in batter.
4. Heat a large Kadai and add enough oil to deep fry the fritters.
5. Slowly lift the fritters with spoon and fry it in the oil until golden and crisp. Drain the excess oil in kitchen towel.
You can fry thse in two batches. Turn a couple of times to make sure that all sides are cooked and golden.

Neypathal (Deep fried rice pancakes with onion, coconut and fennel)


This was one of the post that I wanted since very very long time. It really took me sometime to get the measurements to put up here. This might be new to many of you out there. Neypathal is one of the festive treats in malabar side of kerala and is made at almost every muslim houses there every once in a while. This is mostly made for dinner along with its combination 
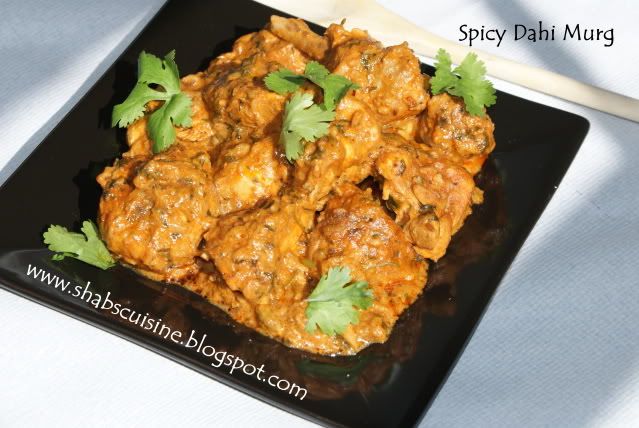
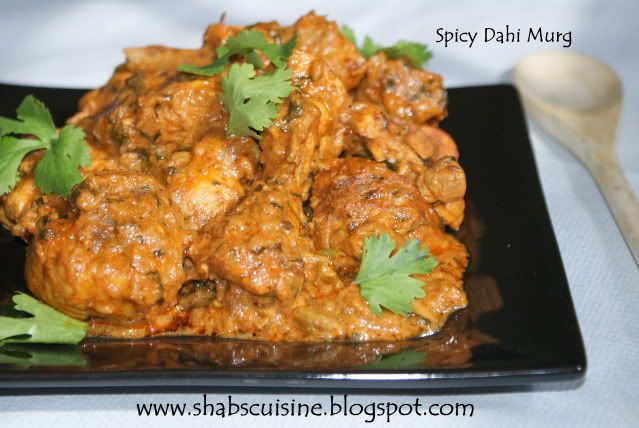
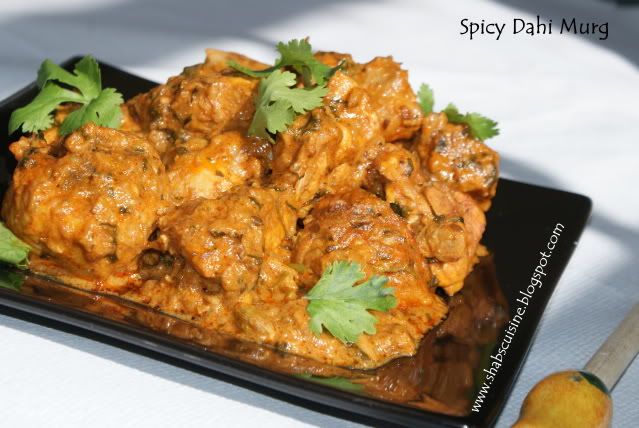
currys like Malabar Chicken curry, pepper Mutton, mutton/chicken Korma, Chemmeen Muringavaal curry, dahi murg etc........ (I will be posting all these currys soon, so that you can try making this with the curry),for dinner during Ramadan or mainly served for guests. We sometimes have it for breakfast along with a banana and a cup of tea. Some of you must already be acquainted with the simple and humble pathiri/pathal that is just made by mixing rice powder and water or by grinding rice, and then flattened it by hand and roasted on the tawa. For some reason, I used to hate pathiri/pathal just because of its bland taste. And used to be upset when my mom makes delicious pathal and fish curry for dinner. I had skipped my dinner many times for the only cause being the dinner is Pathiri!And now I make them whenever I crave for them.

Apart from using rice in neypathal, all other ingredients and methods are different from pathal/pathiri. Pathal/pathiri is normally roasted in a tawa/griddle by lightly rubbing with oil, but neypathal/neypathiri, as the name indicates, is fried in oil. Like many other malabar dishes, this is another rich dish from there. And if anybody hasn't tasted it yet, I would strongly recommend to try this one at least once. Yes, it is that yummy. I don't know anybody who doesn't like this dish. If you are making it for the first time, try it with long grain rice (Pachari) and half the amount mentioned in the recipe. Because, if the rice is not the right one, you might not be able to get the right texture. And pachari cant go wrong. I have tried few parboiled rice in here, and some of them didn't work right for this recipe. There are quite a few methods of how you can make neypathiri. All are given below.
Method 1

Ingredients:
2 cups long grain rice (Pachari)
1 cup water
1 1/2 cup freshly grated coconut
1 large onion (200g)
1 cup rice powder (Unroasted)
2 tspful fennel (perumjeerakam)
1 1/4 tsp salt

Preparation:


1. Soak the rice in normal tap water for 3-4 hours.
2. Grind it along with minimal water until you get a coarse and grainy mixture. When you touch the ground rice, it should be really grainy.(I have used more water here since my grinder doesn't work with less amount than that).
3. Add coconut, fennel seeds and roughly chopped onions to this and grind for few seconds until everything is just crushed and NOT smooth.
4. Tip the whole mixture in to a large bowl, add salt and mix well.
5. Add the rice powder and mix well using hands.
6. Place a large kadai on high heat. Take a golf size ball and flatten it into thick discs of 4-5 mm width (combined width of 2-3 pooris) using the fingers by placing it on a plastic sheet. (I use a shopper bag cut into square shape). Carefully hold the plastic sheet in one hand and remove the pathal using other hand and slowly slide it in oil. Smear the fingers and palm with oil to avoid the dough sticking to the hand.
7. One you put the neypathal in oil you can see bubbles and after sometimes it will float on top and puff up. it will not stretch and puff up as much as poori since there is no gluten in rice, but it will puff up if properly done. As soon as it puffs up, using a slotted spoon, flip it over and fry both sides until golden.
If you make neypathal with this amount of ingredients, it will easily feed 4-6 people.
P.S: This is the amount that I made yesterday for dinner and it came out perrrfect. The amount of water and powder can vary. If you can grind rice using minimal amount of water that would be the best. Then you need to add less rice powder only. YOU CAN MAKE NEYPATHAL BY HALVING THE AMOUNT IF YOU WANT TO PREPARE IT JUST FOR 2-3 PEOPLE. I normally make with this amount, have it the next day or for breakfast or brunch the next day. The dough can also be kept in fridge and neypathal can be made the next day.

Method 2:


Ingredients:
2 cups Parboiled rice (Puzhukkalari)
1 1/2 - 2 cups freshly grated coconut
1 large onion (200g)
2 cups water
1 cup minus 2 tbsful rice powder (Unroasted)
1 1/2 tbs tspful fennel (perumjeerakam)
1 1/4 tsp salt
Preparation:
1. Soak the rice in tap water overnight.
2. Grind it along with minimal water until you get a coarse and grainy mixture.
3. Add coconut, fennel seeds and roughly chopped onion to this and grind for few seconds until everything is just crushed and NOT smooth.
4. Tip the whole mixture in to a large bowl, add salt and mix well.
5. Add the rice powder and mix well using hands.
6. Place a large kadai on high heat. Take small portion from the dough and roll it in round shape by placing it in the palm to a size of a golf ball. from flatten it into thick discs of 4mm-5 mm (thickness of 2-3 pooris)width,using the fingers by placing it on a plastic sheet. (I use a plastic shopper bag cut into square shape). Carefully hold the plastic sheet in one hand and remove the pathal using other hand and slowly slide it in oil. Smear your hand with little oil, so that the pathal doesn't stick to the hands when you drop it in oil.
7. Once you drop the neypathal in oil you can see bubbles on top of the pathal and after sometimes it will float on top and puff up. It will not stretch and puff up as much as poori since there is no gluten in rice, but it will puff up if properly done. As soon as it puffs up, using a slotted spoon, flip it over and fry both sides until golden. if it doesn't puff up, just slowly tap the pathal at the edges with the spoon until it puffs up. These all are tricks that I learned from my mistakes.

Method 3:
One of my distant relatives told me that neypathal can also be made of 'Puttu podi' since the rice is coarsely ground. I have never tried that method yet so I don't have the exact amount in hand. But I bet this method is the most easiest one. Since Puttu podi is not widely available here, I always opt for other two method. But again, the first method using pachari is easier than the one using Parboiled rice since pachari (Long grain rice) takes less soaking time and of course grinds easily.Anyways, for the puttupodi method everything is same as above, but instead of using rice and rice powder, we use puttupodi.Here is the method.


1. Boil water and add salt.
2. Crush coconut with fennel and onion. Keep it aside.
3. Add the puttupodi to the boiled water and mix. Add the ground mixture and mix well.
4. The mixture should just be firm enough to make a ball out of it and flatten it and drop it in the oil.

Important points to be Noted:
1. If using parboiled rice, the texture differ mainly because of rice. I had to change the rice few times because my neypathal wouldn't come out good. Either it would never get cooked, or it would be too hard. My mom uses sona rice for making this. If you are in the UK, you can get the rice that comes in a blue packet at tesco. It is mentioned in the packet as 'Easy cook long grain rice'. But that works very well for this one.
2. If you are new to this dish, I would recommend you to try with Long grain rice (Pachari), just because, pachari is widely available and it cant go wrong as parboiled rice.
3. If you don't have rice powder, you can lay several layers of towels or thick cloth and pour the batter in this stacked towel until it absorb all the moisture from the ground mixture and you get a soft rice dough that you can form into a ball. My mom makes it this way. She grinds her rice in the large electric mortar (Ammiyum kuttiyum) by adding very minimal water, just few tablespoons of water. Since I don't have have that mortar, I add lot of water for my grinder to work. And have to substitute that moisture by adding rice powder. So use minimal water as possible.
4. If the mixture is too dry, it will be easy to flatten it, but it will start cracking in the oil, and it will be dry. SO make sure,just make the the dough firm enough so that you can make a soft ball and fry it in oil. It might take some time to get the hang of it, but once you are used to it, it will be easy. I remember when I first started making this dish, I was so scared when I start to drop the pathal in oil and I drop it from a distance, I think i should say throwing it from a distance, spilling the oil everywhere and smearing the whole surrounding area with oil. Sometimes oil splashed on me as well. So the best thing is to drop slowly into the oil. Just slide in slowly and it works perfect.
5. If the pathal is too thick or too thin, it might not puff up all the time. So adjust accordingly.
6. And most of all, the oil should be really really hot. After frying few neypathal, the oil temperature drops down drastically. So wait for sometime, until the oil is smoking hot and then continue frying them again.

Best reheating method:
The best way to reheat the neypathal would be steaming them until soft. By this way, they really become soft. I also microwave sometimes, but as usual with the Micro-heated stuffs, if not eaten immediately, they go hard.

Tuesday 11 August 2009

Pazham Nirachathu (Stuffed Plantains)


Hi all,
Finally reached the new place,I think I should say 'an old place' because the present building is an old Victorian building unlike the previous flat we lived in. But its quite spacious compared to the previous one.Thank god. Normally Flats and houses in UK have quite small rooms and lounges, but the present one has quite huge bedrooms with lot of space for my little one to run around. Ya, now I too have to run around alot than before:).....There's quite lot of stairs inside the flat since it a 2 1/2 storey flat.......ya, that half is for the storage area in the attic that is few steps from our second storey!!In spite of all that I just love this place. It's a huge widespread city with big block of old buildings everywhere and city centre is just few steps away from here. We have many Asian shops as well where we get the Asian stuffs and vegetables. The city looks amazing and is really really beautiful. I will try to put up some snaps of the city when I get some, OK. I thought I would be upset thinking about the old flat and will be nostalgic about it. But no, I am very happy we moved from there. The previous flat was quite small. The weather is OK at the moment, it was sunny for the past few days and by the time winter arrives, I will be accustomed to the weather here, that was the main thing that worried me-the winter.

I haven't started my cooking much yet. Unpacking is still on the way and things are just getting settled. Loads of shopping to do and lot of arrangements to be done. But I have few recipes in my draft which I will post slowly as things gets smoother. We dint fix the TV yet and just got Internet connection recently. But I found that my life is so peaceful without those two. I feel these two inventions are a bit more than devil at times. Now, not having them, I just realized how much of my time TV and computer has been eating up!!! Before I had no time for other house hold work and I dint realise that I have been using these TV and PC so much! Now they are not here, I find lot of time everything and even have lot of time to rest after that. I think I should spend really less time on these and concentrate on something that's really useful.


Anyways, this time, I am posting the recipe of Pazham Nirachathu. This is traditional malabar snack that is mainly served for guest during an evening tea, or during Iftar. It is something like an Ethakka roast and is prepared using ripe plantains. My mom used to make it for us for evening tea whenever there are ripe plantains at home. Pazham nirachathu is made by making three slits lengthwise in the plantains and filling the slits with a mixture of egg and sugar. The whole stuffed plantain is then dipped in a batter of plain flour and water and then deep fried until golden brown. These are then served in slices.


Ingredients:
2 large Plantains
2 large eggs
4 tbs sugar (70 gms)
1 tbs Kismis (raisins)
10 Cashew nuts chopped roughly
1/2 tbsful -1 Tbsp ghee (Clarified Butter)
1/4 tsp cardamom powder (3 crushed cardamoms)
1/2 cup plain flour
3 tbs Rice flour
1 tbs sugar
a pinch of salt
1/2 cup+ 1 Tbs water (Just enough water to make a thick batter to coat the plantains)
Oil to deep fry

Preparation:
1.To prepare the filling:
Break the eggs in a small bowl and add sugar. Mix well using a spoon. Keep them aside.Heat a frying pan, add ghee and fry the chopped cashew until golden colour, fish them out and drain them on a kitchen towel. To the same pan, add the raisins and leave there for few seconds until they puff like little balls. DON'T LEAVE them for long because they will get charred and taste bitter. Take them out and keep them along with the cashews. In the same pan, add the egg - sugar mixture, raisin and nuts and scramble them by stirring continuously until the egg is completely cooked. Add the crushed cardamom and stir well. Reserve.
2. To Stuff the plantains: Peel the plantains. Make three slits lengthwise at equal distance from each other;one end to another leaving around 2 inch from the ends. The depth of each slit should be made just until it reaches the center of the plantains(near black seeds). When you make three slits as such, all three will be joining the center. Now take the filling, make a gap in the slit using fingers and fill the filling in using spoon or fingers and press them tight. Fill all the three slits in the same manner. I find it easier using fingers. Keep them aside.
3. To make the batter: Mix the plain flour, rice flour, sugar and salt. Add water and mix well using a whisk until you get a required thickness to make a thick coating for the stuffed plantains. Make sure you batter is free from lumps.
4. Heat a high sided frying pan and fill it halfway with oil. Dip the plantains in the batter completely and place them in the oil using 1 or 2 large spatula or tongs. When one side turns golden, flip over against you slowly and fry that side also until golden brown. Drain them on kitchen towel and serve warm in slices along with tea.


Notes:
1. The sugar amount given here is for caster sugar.I used the proportion of 2 tbs of sugar for 1 large egg. Here I have used extra refined sugar which is slightly less sweeter than the sugar we get in India. But if you are using the sugar in India use 1 tbsful of sugar for 1 egg, the eggs in India are smaller as well. So you might need to use around 3 eggs and 3 tbsful of sugar for the above amount of plantains.
2. Sometimes it is difficult to turn the whole plantains in the oil. In that case, you can halve the plantain and stuff like the full plantains instead of stuffing the whole one.
3. This is normally made using quite well ripened soft plantains (not too soft) because if you prepare these using semi-ripe plantains, it might break when you are slits making the job harder.
4. You can also use large kadai filled with oil and deep fry these pazham nirachathu.
5. If you don't like the crispy coating outside (most people including me like it), you can just cover the slits using the batter instead of dipping the whole plantain in the batter. In that case you might need less flour.
6. Some prepare the filling using coconut and sugar instead of egg, so swap coconut for egg if you don't like egg.

Another Thing about this post is my sweet friend faiza has passed me few awards with a tag and a bunch of questions. Thank you so much!
Here are the awards and then comes the tag


Now the answers to the questions...

1.what is your current obsession?
Baking and Blogging.

2. What are you wearing today?
Skirt and top.

3. What’s for dinner?
Malabar Chicken Curry and Puttu (Steamed rice cake)

4. What’s the last thing you bought?
Few clothes and a Scarf.

5. What are you listening to right now?
Light snoring of my 2 year old and sound of the traffic on street.

6. What do you think about the person who tagged you?
She is a sweet friend with a bunch of lovely recipes and a beautiful blog.

7. If you could have a house totally paid for, fully furnished anywhere in the world, where would you like it to be?
In Abu-dhabi, U.A.E. or where ever my parents plan to settle, there.

8. What are your must-have pieces for summer?
A napkin is a must, then comes my indispensable Nivea (for men-I dono y, but I like the men's deo)deo roll on, and Body cream.

9. If you could go anywhere in the world for the next hour, where would you go?
India, my parents and siblings are there at the moment. If they were in UAE, I would prefer going there. I am very attached to them.

10. Which language do you want to learn?
Nothing preferably. I would love to speak Arabic fluently though rather than just mixing Arabic and English.

11. Who do you want to meet right now?
My parents and siblings. I always miss them.

12. What is your favorite colour?
It changes from time to time. Once it was pista green. Then in few months time, I noticed almost all my clothes were pista green colour. Then it changed to baby pink, then to white, then black.....now, nothing favourite as such. Whatever looks good in any colour I go for it.

13. What is your favourite piece of clothing in your own closet?
My beautiful Choli, that I wore for for my wedding.

14. What is your dream job?
Ahhhhh…….Love the job of an architect, But I am not.....Love cooking, But I am not a chef......I donno...

15. What’s your favourite magazine?
Vanitha and all food magazines.

16. If you had $100 now, what would you spend it on?
Ahhhh.....may be a handbag and few baby clothes.

17. What are the most essential things you carry while going out?
Mobile phone, Purse, Pen and a paper.

18. Who are your style icons?
None.

19. Describe your personal style?
Simple and cheerful and always excited.

20. What are you going to do after this?
Have a cup of coffee.

21. What are your favourite movies?
Not a movie person at all, but I enjoyed watching ‘Vietnam Colony’ (malayalam). It’s a hilarious movie.

22. Give us three styling tips that always work for you:
Light make up especially Lining eye and lips to make it prominent, using facial scrub once or twice a week to keep the skin fresh and smooth, wearing comfortable clothes.

23. Coffee or tea?
Both depending on my mood. When I am in a coffee mood, I can't have tea and when I am in tea mood, I can't have coffee. Weird right?

24. What do you do when you are feeling low or terribly depressed?
I try to keep myself busy by doing something and totally distract myself or make a phone call to my mom and talk to her just for some relief.

25. What is the meaning of your name?
Best friend

26. Which other blogs you love visiting?
All other blogs.

27. Favorite Dessert/Sweet?
Cheesecakes, tiramisu, Kalakhand….oops, I don’t have a favourite dessert, I have many!

28. Favorite Season?
Autumn

29.Which is your dream destination?
States.

30. Who/what inspired you to start a blog?
Other Blogs and for personal reference.

31. Which is your favorite international cuisine ?
Pasta.

My question:
Which is your favourite cookware?

The rules are:
Respond and rework – answer the questions on your own blog, replace one question that you dislike with a question of your own invention, and add one more question of your own. Then tag eight or ten other people.

Another sweet Blogger friend smitha has passed on this beautiful Kreative blogger award to me.
The Kreativ Blogger award comes with some rules:-
1. You must thank the person who has given you the award.
2. Copy the logo and place it on your blog.
3. Link to the person who has nominated you for the award.
4. Name 7 things about yourself that people might find interesting.
5. Nominate 7 other Kreativ Bloggers.
6. Post links to the 7 blogs you nominate.
7. Leave a comment on which of the blogs to let them know they have been nominated

So here are few about me for you to know:
1. I am a born chocoholic. Apart from chocolates, any sweets makes me crazy and drool.
2. I am a very sensitive person.Little things make me very happy and little things makes me very sad and upset.
3. I love shopping like many other woman, especially clothes and crockeries, but window shopping is what I do most of the time:). Since I am very choosy by nature, it always takes very long time for me to choose clothes, handbags, shoes and anything which always drove my parents crazy and now my husband.Hehe....I remember when we (Parents and myself) were shopping for my wedding dress back in UAE, we spent three days roaming all over Abu- Dhabi looking for clothes and I liked none. You know finally what my parents did? They went and bought one of my wedding dresses without taking me! But I liked it.
4. I am a chatterbox by nature. I never run out of topic to chat. My phone calls always lasts for more than an hour and my mom and husband always wonders what's there to talk sooooo much!!! Not to talk is like a torture to me. But when it comes to writing, I am worse at it.
5. I love cooking and love trying out new recipes no matter what is.
6. I am a very family oriented and homely person and love to spend time with my family.
7. I love my friends and I really care for them. I always try to keep in touch with them through calls, mails and visits. I still have contacts with friends from my U.K.G., ie Senior K.G. They are a big part of my life.

I want to pass these awards and tags to these lovely people. Please accept these awards.


Sushma
Dhanya
Kitchen Flavours
Ann
Pavithra
Divya Vikram
Prathibha
Yasmeen
Seena
Maria


Ufff...that was a long post guys. See u all later.....taaataa....


Related Posts Plugin for WordPress, Blogger...