Wednesday 30 June 2010

Nadan Kozhi Curry (A simple Kerala Style Chicken Curry with Fried Potatoes)


Ingredients:

1 Kilo Chicken cut into medium size pieces
2 ½ large onion finely chopped (340g, 2 ¾ cups)
8 large flakes of garlic minced (2 good Tablespoons)
1 ½ inch fat piece of ginger minced (1 heaped tablespoon)
3 small tomatoes, chopped fine (240g, 1 ¼ cups)
1 large potato diced to 1-1 ½ ”(250g, 1 ½ cups)
2 1/2 – 3 rounded Tbsp lightly roasted coriander powder
1 ½ tsp black pepper powder
¼ tsp turmeric powder
½ tsp Garam masala
4 green chillies, slit lengthwise
A handful of curry leaves
¾ - 1 cup thick coconut milk
Salt as needed
Oil- as needed
4 small pieces cinnamon sticks
3 cardamom pods
5 cloves
½ tsp fennel seeds

Preparation:


1. Wash chicken and drain.

2. Heat a large saucepan to medium heat and add few tablespoon of oil. When hot, add diced potatoes and cook until it turns golden on all sides. Drain on kitchen paper and reserve.

3. In the same pan, add cinnamon sticks, cloves, cardamom and fennel seeds and sauté for around 30 seconds until it leaves aroma. Add onion and salt and sauté till it is completely soft and starts to turn golden. Add ginger and garlic and sauté for a minute until the raw smell goes off.

4. Add tomatoes and slit chillies, cover the pan and cook for 4-5 minutes until tomatoes goes completely mushy.

5. Add coriander powder, pepper powder and turmeric powder and sauté for couple of minutes.
6. Add chicken pieces; mix well until it is evenly covered in masala. Add 1/3 cup of waterif requied, cover the pan and cook till chicken becomes tender. (You may omit adding water here, if the chicken is added to the curry without completely being drained.)

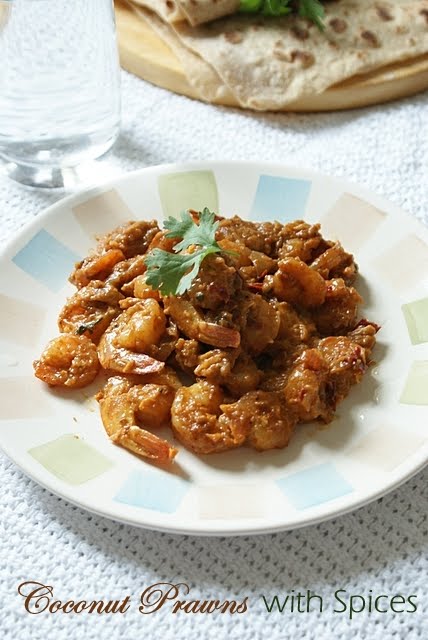
7. Add coconut milk, fried potatoes, garam masala and curry leaves and cook for 3-4 minutes until all flavours are well blended. Serve hot with rice, chappathi, coconut rice, Neypathal, poori, Pathiri etc.

Sunday 27 June 2010

Kalakand Made Easy (Microwave Version)


Shab's Cuisine finally exceeded 1 lakh hits, yesterday and here is a decadent sweet to celebrate this small milestone- Kalakand. The counter was uploaded somewhere last year, so the count should be for an year or more. When it comes to Kalakand, it is a popular Indian sweet traditionally made from ‘Chenna’ and ‘Khoya’ and sweetened with sugar. ‘Chenna’ is typically ‘paneer’ (Indian cottage cheese) which is un-ripened cheese prepared by curdling milk either by adding lime juice or acetic acid. On the other hand, ‘Khoya’ is very thick milk reduced by heating milk over a prolonged time. Prepared ‘Paneer’ or ‘chenna’ is then cooked along with ‘Khoya’ until it reduces into doughy and lumpy texture. It is then sweetened with sugar, flavoured and garnished with nuts. The whole process takes a painful amount of time with lot of stirring and constant watching! Quite a time consuming affair, isn’t it? You can watch this traditional preparation of Kalakand at manjulaskitchen. She explains it beautifully there and I got the above information through her video. She has tempted me enough to try the traditional version at home, well, some time later.


Once I started blogging, I was astonished to see the recipes of so many Indian sweets on net and some of them were easy and pretty straight forward! I Had bookmarked some recipes and kalakand was one among top ‘to try’ list. Recently Kalakand appeared on few minute wonders which inspired me even more. So gathered all the ingredients, went ahead and made it without further thinking. For the amount of ingredients given here, it makes huge amount of kalakand, so you may try halving the recipe. I froze the leftovers for later use, which can be thawed just before eating.


Here is a quick version of the exquisite Sweet, easy to do and something that takes considerably less amount of time compared to the original one. Here, the recipe uses ricotta cheese which is an Italian cheese. Freshly prepared paneer may be used instead of ricotta, but you may need to adjust the cooking time accordingly depending on the moisture content. I would say this Kalakand preparation is really good in taste and texture, perfect to soothe your sugar cravings, but it is slightly different from the shop bought ones. It's taste was something like a cross between a Peda and Kalakand, which are both really good but texture was just perfect.


Kalakand (A Popular Indian Sweet made easy)
Serves 20

Ingredients:
2 ½ cups (650 g) Ricotta Cheese
2 * 397g Condensed milk
1/3 cup Cream of wheat/Rawa/semolina (5 Tbsp,sharp)
1/3 cup – ½ cup white granulated sugar
2 tsp Butter or ghee (Clarified butter)
¾ tsp cardamom powder
Chopped almonds to garnish
Chopped pista to garnish

Preparation:


1. In a large 2 litre microwave safe bowl, tip in ricotta, condensed milk, sugar, Cream of wheat and butter or ghee and stir until it is thoroughly combined.

2. Place this bowl in Microwave at cook it at high power for 3 minutes. Take it out, stir well and put it back in for another 3 more minutes. Take it out and stir well again. Do it few more times, but you can increase the time up to 5 minutes and stirring in between, for a total of fifty minutes. Here my Microwave oven is 800 Watts. Ovens with more or less power, cooking times may be changed accordingly. Make sure you keep an eye on it constantly as it may spill out if you are using a small pan. Cook the mixture until you get a slightly stiff mixture, which is something like a very soft dough. Add cardamom powder and mix very well.

3. Tip in the mixture in an oiled dish and spread evenly. Sprinkle some chopped pistachio and almonds on top and press gently. Let it come to room temperature and then chill it in the refrigerator until slightly firm and cut into squares of 2 ½ inches. Makes 16-20 pieces.

Notes:

1.You may replace ricotta with chenna or freshly prepared paneer. Adjust the cooking time depending on microwave oven. Cook until it all the liquid had evaporated and the mixture starts getting lumpy and doughy

2. You may also cook it on the hob using a heavy base saucepan, on a moderate heat if it is convenient, with constant stirring to avoid burning.

Tuesday 22 June 2010

Cherry Crumble Cake with Cinnamon


For the last couple of weeks the weather has been perfect, all bright and sunny and I just was in mood for baking something fancy. That is when I spotted this lovely Cherry cake at Mowie’s delicious blog and instantly fell in love with it. This cake was cooked the next day I saw at his space and is one of the best cakes that I had in recent times. I very much like the look and taste of it.  Mowie's recipes are simply superb and his photography is just beyond words - stunning, marvellous, creative and what not! The cake looked like a huge one for my small family, so as usual I halved the recipe and baked it! I don’t really know if halving has made any difference in flavour or taste, but it came out well and you can see the result - A perfectly baked cake, that’ so pretty and elegant. The golden crumble and the bright red cherries added an extra chic to the cake. One thing I would like to put in notice is that I would like my cherries to be slightly immersed in the batter rather than resting on top. So I might try pressing the cherries gently into the batter, just halfway through, so part of the cherries go down the batter and part of it stays on top. Here you go, an amazing recipe, that’s definitely a keeper. Please Visit Mowielicious for the original recipe and inspiring photography.


Cherry Crumble Cake with Cinnamon

Ingredients:

For the Cake:
160 g (1 cup) Plain Flour
100 g Unsalted butter, at room temperature
160g (around ¾ cup) Castor sugar
2 Medium eggs
1 Tsp Baking powder
4 Tbsp (1/4 cup)Milk
1 tsp Vanilla Essence
150g Cherries, pitted and halved (1 cup)
Extra sugar to sprinkle

For the crumble:
75g (8 Tbsp/ ½ cup ) Plain flour
50g Cold Butter
40g (2 ½ Tbsp) Castor Sugar
2 Pinches of Cinnamon powder


Preparation:

1. Preheat the oven to 175 degrees Celsius 10 minutes prior to baking. Grease and line a 7” round pan and keep it aside.

2. Whisk the butter, sugar and vanilla with an electric mixer until light and creamy.

3. Add eggs one by one and mix well after each addition.

4. In a separate bowl sieve together flour and baking powder.

5. Fold this flour mixture gently into the wet mixture. Do not over mix. Add milk and mix gently until just combined.

6. Pour this batter into the prepared pan and level the surface.

7. Top with cherries and sprinkle some sugar all over until evenly covered.

8. Combine all the ingredients for the crumble with hands until it resembles bread crumbs. Sprinkle it all over cherries evenly covering them.

9. Bake it in the centre rack of the pre heated oven for 45 minutes or until a skewer inserted in the middle of the cake comes out clean and the crumbs turn golden. Serve warm or cold.

Tuesday 15 June 2010

Coconut rice – South Indian style.


Coconut rice is a very popular rice preparation from Southern part of India where coconut is found in abundance in almost every household. In south Indian cooking, anything and everything including gravies, dry curries, rice varieties, snacks, sweets etc mostly uses coconut in different forms at different stages of its maturity. Juice from the tender coconut is used as a refreshing summer drink and the flesh is scooped and eaten. Sometimes the flesh is blended along with the juice for a delicious drink. Mature coconuts are peeled, the shell is then cracked, and the flesh is then grated using a coconut grater, a handy tool designed specially for grating coconut. In the western countries, you might not be able to find the coconut scraper. In that case all what you can do it, place the whole coconut (Husk removed) on flame turning all sides for around 5 minutes. It works well on electric hobs as well. Due to high heat, the shell will loosen from the flesh and start to crack. Drain the coconut water off or drink if if you wish. Cover the heated coconut in a cloth and Crack open the shell using a rolling pin. Covering the coconut using cloth will prevent any mess that occurs while cracking the shell. The flesh can then directly be grated using our regular vegetable box grater and the flesh can be frozen infinitely.

Grated coconut in used in many dishes as it is to give a sweet bite. Mature coconuts are scraped for flesh which is then ground to extract milk which is used in many savoury dishes to impart a rich and sweet taste. It is also used in many desserts and puddings or payasams. It is also famous being used in cookies, tart and cakes. Coconut at later stage is sun dried where oil is then extracted from them and is used for everyday cooking and frying! Now for ease of use, you get coconut in all processed form - readymade coconut milk in cans, coconut in desiccated form and coconut powders that can be just mixed with hot water to produce coconut milk and even coconut cream. Freshly grated coconuts are also available widely in frozen form mainly in the Asian stores. All these processed form of coconut tastes good, but nothing would beat the fresh coconut taste. That’s just a general info for my non-Indian readers here. Here you go with yet another tasty rice preparation, which goes well with many vegetarian and non vegetatian curries equally.


South Indian Coconut rice
Serves 6

Ingredients:
3 cups Basmati rice (uncooked)
1 ½ cup freshly grated coconut
Salt as required
Water - to boil rice.

For tempering:
1/3 cup – ½ cup coconut oil
2 tsp Urad Dal
1 tsp Channa Dal (Bengal Gram)
1 tsp Black mustard seeds
2 pinches asafoetida
2 twigs curry leaves
4 whole dried Kashmiri red chillies, halved
15 Cashew broken or a handful of peanuts

Preparation:

1.Wash rice several times. In a large saucepan bring water to boil. Add salt and rice and give it a good stir to avoid forming of lumps. Keeping the lid open, cook rice till done. (You can boil water in a kettle, to ease up the process). Take the pan off heat and drain water off in a strainer or colander.

2. Meanwhile, Heat another large saucepan, large enough to accommodate all rice (you can use the same pan used for cooking to reduce washing up!). Add oil and when hot, splutter mustard seeds followed by urad dal, channa dal and cashew nuts.

3. When both dals and nuts start to take golden colour, add chillies and curry leaves and stir for few seconds. Add in coconut and stir well to coat all the tempered oil and cook for 2-3 minutes. Add asafoetida and mix.

4. Tip in the drained rice and mix well until the tempered coconut is evenly distributed all over the rice. Serve hot with any non vegetarian or vegetarian curries.

N.B: Make sure not to burn the lentils because that will impart bitter flavour to the rice.

Monday 14 June 2010

Coconut Prawns with Spices


This is one recipe that I turn back to again and again when I am lost in thought on what to prepare for side dish! We, approaching the edge of being fully carnivorous, I have to come up with some non-veg side dishes to go with any vegetarian main course. This is one quick side dish that I prepare with some ready peeled prawns in the freezer. Very unexpected marriage of flavours happening in here, unlike the regular prawn preparations you may find in my blog and I have ever eaten. I found this recipe on pack of maggi coconut milk powder, made few lazy tweaks and here is the final outcome. Please refer to notes for the original notes.


Ingredients:

250g Cleaned jumbo king prawns
1 Tbsp oil (vegetable or coconut)
1 Large onion, grated (140g)
1 Large clove of Garlic grated
2 Dried Kashmiri chillies, chopped finely (optional)
½ tsp cumin powder
1 tsp paprika/Kashmiri Chilli powder
1 ½ Tbsp yogurt
Scant ¼ tsp cardamom, powdered
Scant ¼ tsp cinnamon, powdered
Scant ¼ tsp cloves, powdered
½ tsp crushed cumin seeds
2 Tbsp coconut milk powder
Salt - as required

Preparation:

1.Heat oil in a saucepan or frying pan. Add grated onion,grated garlic, chopped chillies, paprika or chilli powder and salt. Sauté until onions starts to turn golden.

2. Add prawns and curd. Mix well, cover and cook for around 8-10 minutes on medium flame until almost cooked.

3. Add coconut powder along with rest of the spice, stir well and cook for further 3-4 minutes until the gravy is almost dry and smothered in the sauce.


Notes:

1. The original recipe calls for pounding fresh spices and adding it at the end. If you are patient enough to pound the spices, roast 1 cardamom, 2 whole cloves and a small pieces of cinnamon stick and pound it fine. Add it at the end along with coconut instead of ready made spice powders. Freshly pounded spices give it a fresh aroma than the ready powdered spices.

2. Original recipe also doesn’t call for dried chillies. Adding dried chillies and chilli powder makes it really hot. So add paprika along with the dried red chillies or omit the dried ones as per your taste.

Thursday 10 June 2010

Aubergine (Brinjal/ Eggplant) Pickle


I am not a pickle person myself unlike many out there including my siblings! But aubergine pickle (Khanum Brand) which is a very sweet and mild pickle is an exception. It is just my kind of pickle, mild, sweet less tangy and it goes well with naan, chappathis and rice. I sometimes have it for dessert!!! I guess, I would be the first one (may be the only one) who devour pickle for dessert. Never had I fallen in love with any ‘Achaar’ aka pickle other than this sinful aubergine pickle of ‘Khanum’! I first had it at our friend Sajitha’s place where they offered it for one dinner on one of the many dinners she served us. Those were our golden days in Portsmouth; we used to meet them once in every while mainly on weekends and how much I miss those days now...Sigh. We really had fantastic time together.


You must be thinking, if I liked that pickle a lot, then why did I bother making one, right? These days I can’t find Khanum Aubergine pickle anywhere in the locality. I tried couple of other brands and I wasn’t happy at all. I was so desperate to have it and that was when the thought of preparing one popped up in my brain. This came out real good but not the taste that I was looking for. I intended to prepare a sweet pickle as the Khanum one, something that’s not spicy, less tangy and sweet. But mine tasted like a typical Kerala style pickle. I am sure many out there who enjoy pickles will love this too. It is so easy to make pickle and it is hassle free a process. Now I need to try my hands on making a sweet Aubergine pickle, which you might see later on this blog, hopefully!

Ingredients:

1 Large aubergine (250g)

To grind:
2 Tbsp finely chopped ginger
1 Tbsp finely chopped garlic
1 – 1 ½ Tbsp Kashmiri chilli powder
½ tsp turmeric powder
4 Tbsp vinegar
¾ tsp Black mustard seeds
½ tsp fenugreek seeds

Others:
½- 3/4 cup coconut oil (I used only ¼ Cup of oil)
1 Tbsp finely chopped ginger
1 twig curry leaves finely chopped
2-4 green chillies cut into thin rounds (optional)
8 Tbsp castor sugar
½ cup vinegar
¼ cup water
¾ Tbsp salt or as required


Preparation:

1.Cut the aubergines into 2 inch long fingers and leave them immersed in bowl of brine for around 3-4 hours. This will remove any bitterness and stain in the aubergine. Drain water; wash the aubergine several times to remove excess salt and pat dry in a muslin cloth or kitchen towel.

2. Grind together chopped ginger, garlic, chilli powder and turmeric powder to a smooth paste. Add mustard and fenugreek and just whizz once to crush them.

3. In a clean sauce pan, heat oil. Add crushed ginger and sauté it till it starts to turn golden. Add chopped curry leaves and green chillies (if using) and let it sizzle. Add the ground mixture and stir for couple of minutes (Make sure you do it in low flame to avoid burning of spices).

4. Add brinjal and mix well to coat the spices.

5. Add sugar and vinegar. Mix well, cover the pan and continue cooking till aubergines are cooked through.

6. Add salt and water and bring to boil. Adjust the salt if necessary.

8. Once the Pickle is cooled completely store them in sterilized jars.

As any other pickle, this pickle tastes better after 4-5 days, even though it can be had as soon as it is made. This pickle fills a 500 ml Jar.

Notes:

1. To sterilize jars, boil the jar and Lid for about 10 minutes. Take it out and let it dry completely without any water inside. Do not wipe the jar.

2. If you need more liquid for your Pickle you may use a little more of water than mentioned. But make sure you boil water after adding else the pickle won’t last long.

3. I haven’t used the green chillies here since my red chillies were really hot even being Kashmiri chilli powder!

Monday 7 June 2010

Indian Style Roasted Chicken with Minced-meat Stuffing

.

Hi all,


Here is one Delicious recipe that I tried couple of weeks back. It was served along with arabic bread, hummus and veggies thats were roasted along side the chicken. I found this recipe at http://www.about.com/ and edited the recipe as I went along. If you have any doubts on how to prepare the chicken you can have a peek at my Kozhi nirachathu. That recipe is quite a long one and the filling is made of egg masala. But here I used mince meat for stuffing and the preparation is straight forward without much complexity. If you wish you can use Kozhi nirachathu recipe completely and just change the filling

Ingredients:
1 medium size chicken – 1 Kilo
Marinade:

2 Tbsp/30 mls thick creamy yogurt
½ Tbsp ginger paste (Fresh)
½ Tbsp garlic paste (fresh)
2-3 tsp Kashmiri chilli powder
½ tsp turmeric
½ tsp salt

For the filling:
350g Mince meat (chicken or lamb)
1-2 Tbsp vegetable oil
½ tsp cumin seeds
1 medium onion (100g), sliced and chopped
2 tsp freshly minced garlic
1 tsp freshly minced ginger
1 ½ tsp coriander powder
1-2 tsp Kashmiri chilli powder
1 tsp garam masala
¼ cup frozen peas
2 green chillies (optional)
1 large tomato chopped (120g, ½ cup)
3 tsp lime juice
Salt to taste
Oil to drizzle over chicken prior to baking
Extra lime juice to pour over chicken while serving


Preparation:

1. Skin chicken and clean well. Make shallow slits on breast and thighs.

2. Mix well the ingredients for the marinade and apply it all over the chicken; inside as well. Refrigerate for a minimum of 1 hour, preferable overnight.

To make the filling:

1.Heat a large frying pan or sauce pan and add oil. When hot, splutter cumin seeds. As soon as they splutter, add chopped onion with salt and sauté till it softens. Add green chillies (if using), ginger and garlic and sauté for a minute or two until the raw smell goes off.

2. Add all the spices (except garam masala) and sauté for a minute on medium heat until the raw smell goes off. Sprinkle little water if it starts to stick to the pan.

3. Add chopped tomatoes, cover and cook till it goes mushy.

4. Add the washed and drained mince, stir well to break up the forming lumps. Add green peas. Stir well, cover and cook till the mince is cooked well and you get a wet filling, which is like a thick gravy and not dry at all. No need to add water since the water will be released from the meat while cooking. Add garam masala, lime juice and chopped coriander leaves and cook for 3-4 minutes until all the flavours are well blended. Adjust salt if need be. Let it cool slightly.

5. Preheat the oven to 200 degrees Celsius (180 degrees for fan assisted oven) 10 minutes prior to baking. Stuff the chicken with meat filling, as full as possible. Tie the chicken legs in away that it covers the opening part. Place the stuffed chicken on baking tray, which has been lined with a greased foil. Pour any leftover marinade on the chicken and drizzle generously with oil. Bake for around one hour, less or more as required turning once or twice in between and pouring the liquid from the tray all over chicken. To ensure if it is fully cooked, poke the thicker parts like breast or thighs with a skewer or knife. If clear juice oozes out from the poked area, then it should be cooked. Make sure you don’t over cook it, as it gets really dry and rubbery. Squeeze generously with lime juice all as soon as it comes out off oven over and serve warm with naan, parattas, rice, Tandoor roti, Chappathis, rice, Arabic bread (khubz) etc.


Notes:

Whenever I bake whole chicken, I normally place quartered onions, chopped vegetables like carrot and potato in the baking tray along with chicken, half way through baking. These vegetables absorb the flavours from the chicken and it is really yummy. I normally add loads of onion, roasted onions tastes fantastic.

Thursday 3 June 2010

150th post and a Zebra Cake in my Kitchen too!


Finally Shab’s Cuisine hits another milestone! It’s been more than two years that I have been blogging my recipes and thoughts and in here and I very much enjoyed every moment of it. I never ever thought I could go so far because I am not the kind of person who is so much dedicated to any hobby apart from blogging. I get all bored after a while and stop it and then forgot about it. But this blog which once was just started to save my recipes and a mere time pass has become a passion and more than that a place to virtually pour my thoughts! I never knew I even had love for cooking until I started this little space of mine! I guess it was hidden in me until I started a blog.

I have never bothered to learn cooking until I settled down completely with my husband, and I guess there are plenty out there like me. During my college days, all I used to do was carrying some dictated recipes of my mom to UK whenever I paid him a visit during my holidays. I thought cooking was so easy, that I could easily cook whatever is written in my book taken from my mom who always gave me approximated measurements. I never bothered to peek into kitchen those days when my mom used to cook for us. When I started cooking from the notes, I realised that it was not an easy thing to start with and I didn’t even know the very basic of cooking like know how much salt to add, how long onions to be sautéed for a simple curry and even how to boil rice! Even then, I turned my back on cooking and din’t bother to learn a bit. That was how much I hated cooking once! Later when I completed my studies and settled with my hubby, I felt that I need to learn at least basic cooking to survive. Started collecting recipes on bits and pieces of paper, and little books, diaries etc . I lost many of my precious recipes because those were scribbled on bits and pieces of paper which I left somewhere carelessly and got lost. I used to see so many blogs around and try many recipes with successful results and that was when I thought I also should start saving my recipes online after perfecting them to suit our taste! Started a blog for fun and here it is now! I still am not sure how far I will be going on with this, but as long as I have support from my readers and friends.


Initially I dint even know something like measuring spoons and cups existed, so all the measurements used to be taken down using regular spoons in my kitchen. I tried the same recipes with measuring spoons and it gave me different results. So I am trying to edit all the recipes using standard measuring spoons and cups.I have learnt so much from blogging, I am introduced to wide range of foods from around the world and fantastic foodies. I also prepare loads of them at home and try to perfect them as it goes. After the blog was started, I did watch too much of cookery programs which ate up so much of time once which I have reduced almost to none due to lack of time. But I still search loads of recipes, peek on many blogs, comment on as much as time allows me. The number of cook books on my shelves is also on tremendous increase and too are the vessels! My camera was upgraded from a simple but a high end point and shoot camera to a Digital SLR. I also believe that my photography (at least for the macro pictures) has become much better than before. Hasn’t it? I also try to collect anything and everything that looks good on pictures be it a shell, a ribbon, flowers, leaves or a piece of paper to make a better background for my pictures, but sometimes I take pictures in a hurry not giving importance for anything. I have also gained loads of wonderful friends and readers who are so inspiring without whom this blog would have far been dead. Thanks to all for the wonderful comments and inspiration. That really kept me going and still keeps me going.


Now, coming to the recipe, Zebra cake is one of the prettiest cakes on its own. It looks pretty as it is, without any frosting done. The cake is similar to the marble cake, but the patterns is zebra striped which make it look stunning. I have seen this cake baked on so many blogs, so this might not be new to many of you. I had prepared this quite a while back with half the amount mentioned in the original recipe and using a 6 inch pan. The result was perfect except for the sweetness part which was really low for our taste. For that reason, I added more sugar and a pinch of salt when I made it the second time. Last weekend we had a get together with our friends and I baked this cake and took along. I also made a simple icing to go with it that I prepared for Celebration chocolate cake. It tasted fantastic with the icing on and everyone absolutely loved it. I first spotted this cake on Farida Azerbaijani's Blog. Have a peek at her wonderful blog to get the original recipe. Here is my tweeked version of it to suit our taste.

Ingredients:

4 large eggs at room temperature
1 1/3 cup castor sugar
1 cup vegetable oil
2 cups+ 2 Tbsp plain flour
1 Tbsp Baking Powder
3 Tbsp cocoa powder
2 tsp vanilla essence
1 cup milk at room temperature
2 pinch salt

For icing,:
Preparations:


1.Grease and line a 9 inch deep cake pan. Preheat the oven to 180 degrees Celsius 10 minutes before baking.

2. Combine sugar and eggs and beat on high speed around 8 minutes until it becomes thick and pale yellow in colour.

3. Add in milk and oil and beat for 30 seconds until thoroughly combined. Add in vanilla essence and beat again.

4. In a separate bowl, combine flour, salt and baking powder and mix well.

5. Add this flour mixture to the wet mixture and beat just until combined and no dry flour is visible. Don’t overbeat the mixture after adding the flour since it will knock out the airy bubbles and result in a heavy cake.

6. Divide the batter into half. In one half of batter add sifted cocoa powder and mix well. Leave the other half plain.

7. Now pour 3 Tablespoons of plain batter in the centre of the pan. Pour 3 Tablespoons of cocoa batter in the centre of the white batter. Don’t spread the batter or wait to spread. It will spread by itself as it goes. Pour Another 3 tablespoon of white batter in the centre of cocoa batter and then cocoa batter. Continue pouring until all the batter is used up. I used separate spoons for both batter to make it easier. If you have a ladle that holds 3 tablespoons of batter, you can use that. Here, I used heaped tablespoon of cocoa batter and scant tablespoon plain batter, hence more prominent cocoa stripes and less white straps.

8. Place the pan in the centre of the oven and bake till done or when the skewer inserted in the centre comes out clean. The original recipe mentions 45 minutes, but mine took 1 hour 5 minutes.

Once the cake is completely cooled, serve as required, plain or with whipped cream frosting or any icing. I did the same frosting that I did for celebration chocolate cake and it tasted just divine.
Related Posts Plugin for WordPress, Blogger...